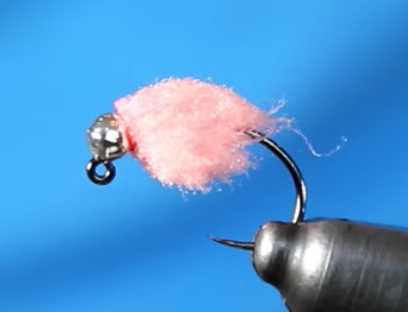
Montée par Tim Cammisa
Voir les matériaux au fur et à mesure des étapes de montage.
La couleur des oeufs est bien saumon et non pas rose comme elle parait sur l'image.

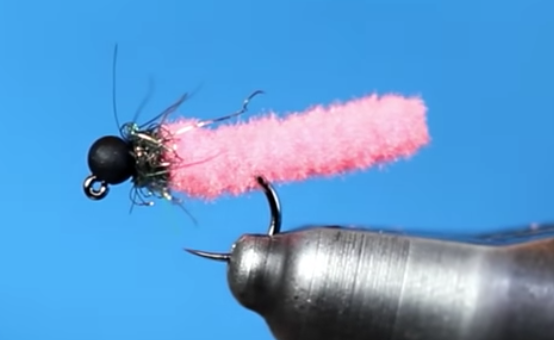
Montée par Tim Cammisa
Voir les matériaux au fur et à mesure des étapes de montage.
La couleur des oeufs est bien saumon et non pas rose comme elle parait sur l'image.
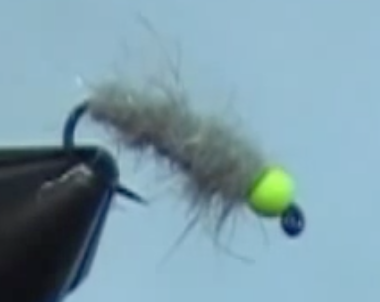
Montée par Tim Cammisa
Voir les matériaux.
Un modèle avec un hot spot en bille de tungstène vert chartreuse fluorescent.

Attractor nymphs are patterns that may not specifically represent an insect, yet still elicit a strike from a fish. Also referred to as prospecting nymphs, the following patterns can be very effective under a number conditions, not limited to: Pressure water, stocked trout, high water conditions (including off-color) ,and fast water such as riffles. These patterns are both fun to tie and fish, hence why they've earned a spot in my box!
WALT'S WORM BLOWTORCH
The Walt's Worm is a pattern that has led to MANY variations...and here's another! Join me in this video as I share the Walt's Worm Blowtorch, plus share a story about Mr. Walt Young.
WALT'S WORM FLY / CRANE FLY LARVA
During this tutorial, we discuss the notion of "hot spots" on flies, and possible materials to use. Next, the Walt's Worm (also known as the Crane Fly Larva), created by Walt Young, is tied, while referencing other materials used. By adding a hot spot to this already effective fly, it is now considered more of an "attractor" nymph pattern.
PHEASANT TAIL NYMPH (W/ HOT SPOT)
During this demonstration, I vary the Pheasant Tail (originally tied by Frank Sawyer) to include a Coq de Leon tail and hot spot near the tungsten bead head. By modifying this fly, it will be different than others fishing a similar imitation, while also increasing its durability and visibility for trout.
THE MOP FLY
The Mop Fly has arrived! In this fly tying tutorial, I share my procedures for tying the pattern, plus talk about how it came to be. There are a variety of places to purchase the "mop material" from, thus be creative in your search, as the greatest variation of this fly (as of now) is changing its color. Have fun with this "guide style" pattern!
MICRO MOP FLY
If you haven't had enough fun with the original, here comes the Micro Mop! This pattern has an application for many situations, especially those discussed in the video. With many variations and tying methods available for this one, the Micro Mop allows for some creativity, plus it's an overall quick tie.
EGGSTASY EGG PATTERN
In this "Two Minute Fly Tying" tutorial, I share the Eggstasy Egg fly, a simple pattern that fish can't resist under certain conditions. In this video, I share the base pattern, but remember that there are multiple variations out there of this fly.
PINEAPPLE EXPRESS BEAD HEAD (W/ HOT SPOT)
In this video, I illustrate Aaron Jasper's Pineapple Express fly, a simple nymph that is highly effective in smaller sizes. The pattern is straightforward, but I also show a second fly with a variation in tail and hot spot color, plus detail how to finish the pattern with only the hot spot showing minus the thread (remember to apply head cement after using this technique!).
RAINBOW WARRIOR
In this video, I describe the materials and steps to tie Lance Egan's Rainbow Warrior fly, a versatile nymph pattern that with steps that are easy to execute. I also feature a unique variation in this pattern:
LIGHTNING BUG (NEW AND IMPROVED!)
Featured in this video is the "new and improved" version of the Lightning Bug, slightly revised from my original video. This is the version you'll now find me using, and I hope you enjoy some of the variations I share in the video.
LIGHTNING BUG BEAD HEAD NYMPH
The Lightning Bug Bead Head Nymph is an all-purpose nymph that is used as more of an attractor pattern when fly fishing. The pattern can be varied by utilizing different materials for the tail, changing colors/sizes in the ribbing, and varying the color and material of dubbing at the thorax. Feel free to experiment with this pattern because the possibilities are endless!
BEAD HEAD CRYSTAL SOFT HACKLE
For this tutorial, a pattern the pattern I chose to tie was the Bead Head Crystal Soft Hackle. This is an intermediate pattern, with the "crystal" section of its name deriving from the type of synthetic material used in the body. Feel free to substitute other colors, and have fun with this one!
TCS BLACK STONEFLY
During this tutorial, I demonstrate a few methods used on a great all-around nymph pattern, the stonefly. This pattern can be fished with many methods, including European / Czech nymphing and when utilizing the hopper-dropper or dry-dropper rigs.
PSYCHO PRINCE
For this fly tying tutorial, I chose a pattern that just screams "variations," Mike Mercer's Psycho Prince bead head nymph. This pattern offers many options when wanting to change the original slightly with variations including altering the body color, ribbing, and hot spot. Basically, there are an unlimited number of variations for you to make, thus feel free to tie some and determine how they fish on your local waters.
COPPER JOHN BEAD HEAD NYMPH
In this fly tying tutorial, I selected one of the most popular flies in the country: John Barr's Copper John. This heavily weighted pattern is distinctive in its look; the Ultra Wire abdomen and epoxy over the wing case set this apart from other flies. When tying, I did vary the epoxy by utilizing a UV glass glue instead, plus I also encourage others to create their own variations of the Copper John.
HOT BELLY PHEASANT TAIL
In this "Two Minute Fly Tying" tutorial, I wanted to share an effective pattern that is equally quick to tie, the Hot Belly Pheasant Tail. For this version, I have opted to remove the legs, and instead pull out sections of the thorax with velcro, thereby creating the impression of legs on the nymph. Have fun tying this pattern, and don't be afraid to vary the thorax with other dubbing; the "hot belly" is intended as a hot spot, and the possibilities are endless.
SQUIRMY WORMY
This is absolutely a fly that qualifies for my "Two Minute Tying" series! The Squirmy Wormy has that deadly combo of being simple to tie and catching lots of fish. There are certain situations that this fly works better than others, and I discuss those (and some tying variations) in the video.
"GINGER SNAP" CZECH JIG NYMPH
In this fly tying tutorial, I explain the procedures for tying Kevin Compton's Czech jig nymph, the "Ginger Snap." This attractor fly, requiring intermediate tying skills, is tied on a jig hook, in line with other Czech-style and Euro jig nymph patterns. The "Ginger Snap" also utilizes additional great components, such as a dubbing loop thorax and peacock quills for the body. Kevin's brother Bryant, who guides for Vail Valley Anglers ( http://www.vailvalleyanglers.com/guide-bryant-compton ) uses this pattern on a regular basis, which speaks highly for the pattern.
JOSH'S WHITE LIGHTNING
In this fly tying tutorial, I feature a fly that was created by Josh Williams of Dead Drift Flies (http://www.deaddriftflies.com/). This pattern, Josh's White Lightning, is an attractor nymph that fishes well in a lot of water types, including slightly off-color. This is an easier pattern to tie, and I encourage you to vary it based on the fish in your area (color modifications would be the best to play around with).
..
This fly tying tutorial features George Daniel's Czech Catnip, a fly commonly used as the "anchor" for those familiar with Czech Nymphing. The anchor fly is the heaviest fly placed on the setup, and this one works great for it bc of both its weight and ability to attract fish. This is a no-nonsense fly, plus relatively simple to tie, and I encourage you to add some of these to your fly box. This is listed as an attractor fly being that you can easily change the body color, and I suggest trying some fluorescent colors.
This fly tying tutorial features a fantastic nymph, the Flashback Pheasant Tail fly. This bead head pattern gets down to where the fish are and has more than enough flash to attract the attention of trout. Some will vary this fly by adding a hot spot to the head, though I feel that the flashback covered in UV glue is more than ample.
In this fly tying tutorial, I show a modified version of Ian Colin James' "Ian's Brass Ass." This is a featured fly on the Orvis website, and though originally tied for steelhead in the Great Lakes Region, this pattern has now become a popular one for Czech-nymph tactics, too. Being that there is a lot of weight to this fly helps it both get to the bottom quickly, and stay there longer. The fly also has a Copper John feel to it, undoubtedly due to the weight. I have varied it slightly, as mentioned in the video, and I encourage you to try your own variations (especially color changes to fish this as an attractor), while maintaining the defining characteristics. This fly has caught steelhead, salmon, and all varieties of trout and grayling; open a spot in your box for Ian's Brass Ass.
In this fly tying tutorial, I show an easier version of the fish-catching nymph, the Copper John. In this version, I incorporate some characteristics of the Pheasant Tail, ala Frank Sawyer, hence the more appropriate name may be the Copper John & Frank!
The Hot Wire Prince Nymph is an effective pattern, primarily because some of its best characteristics are a combination of those found in the Prince and Copper John nymphs. There are some base characteristics of the Prince Nymph, with the added Ultra Wire giving this pattern weight and color. There are many color combinations that can be used for the body, thus don't be afraid to try some others and see how they work in your area.
Featured in this fly tying tutorial is a pattern that is popular among the Czech / Euro jig nymphing crowd, Napoleon's Dynamite. This is a fly that features weight, a slender body, and a couple hot spots. Combined with those characteristics are some great colors, and we have a pattern that catches lots of fish. The hot spot can be as a tag or collar, with the former being more effective in areas that receive lots of fishing pressure. Feel free to modify this pattern to meet the needs of your fishing, and I recommend starting by substituting other fluorescent colors.
In this fly tying tutorial, I demonstrate the techniques used to tie Lance Egan's Frenchie nymph. This effective pattern has been gaining popularity over the last few years, and with good reason: It catches trout! I offer a number of variations, including tying the fly on a jig hook, which will certainly appeal to many crowds, such as those in Euro or Czech-style nymph fishing and competition anglers.
Featured in this YouTube fly tying tutorial is a classic pattern with a modern twist: the Prince nymph tied on a jig hook for European and Czech-syle nymphing. By slightly modifying this fly, we end up with a "Guide Pattern," being that the fly has reduced materials, fewer procedures, and is effective at catching many fish. I recommend this pattern to all, especially if you are interested in European nymphing, including the Czech and French styles.
Being that the Hare's Ear is such a classic and venerable pattern, it's only fitting that applying new styles to it occur more often than not. The Czech-style of nymphing has overtaken many areas of fly fishing, and it's easy to convert the Hare's Ear to that type of a pattern, as shown in the fly tying tutorial.
The Mega Prince bears little resemblance to its predecessor, though they have one major quality in common...they both catch fish! This is both a great trout and steelhead pattern, plus you can be creative and modify the Mega Prince with your favorite colors. This is a great fly to both tie and fish, thus as I say in the video, have fun with this one!
CHUCK FURIMSKY'S "CHUCK NYMPH"
A little-known fact about Chuck Furimsky is that he used to be in the leather industry, and he's applied those skills to one of his newer patterns, the Chuck Nymph. This unique fly features a specially-cut leather called Bugskin, which has great action in the water. You will also enjoy the story behind this fly's name...
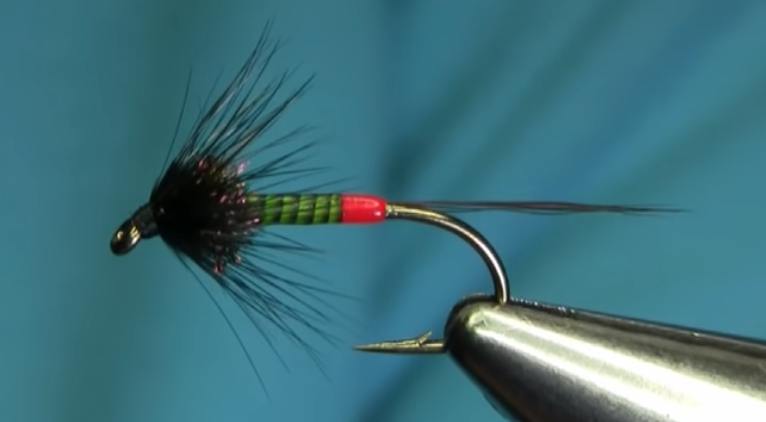
Montée par Makflies
Matériaux:
Thread Hot Orange & Black ,,
Hook size 10-12 ,,
Tail Black & Brown Cock Hackle,,
Body Green Quill
Thorax Peacock Herl with Black Hen Hackle
Autre exemple de hot spot en queue de mouche. De plus on remarquera que les couleurs rouge (orange vif fluo) et vert sont complémentaires et représentent, par contraste de couleur, un hot spot.

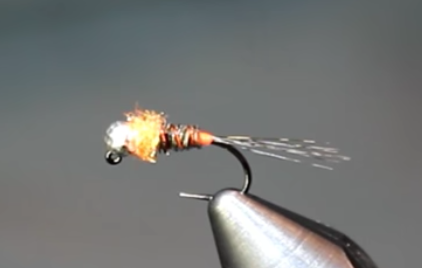
Montée par Tim Cammisa
Voir les matériaux
Noter les spots orange fluo en queue à base de fil de montage, le tinsel mylar sur le dos, le fil de cuivre ou métallique pour l’enroulement, et un dubbing orange vif fluo au niveau du thorax.
Voir la séquence vidéo sur l’intérêt des hotspots.Voir dans la vidéo toutes les combinaisons possibles en changeant de couleur de hot spot. Très intéressant, permettra de faire des tests afin de confirmer l’intérêt des hotspots et des différentes couleurs.
Notes de l’auteur : Voir la traduction de la vidéo sur l’intérêt des hotspots et la traduction de Trout and feather attractor-nymphs .

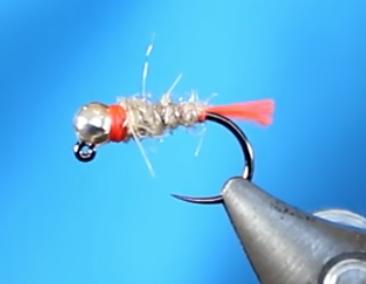
Montée par Tim Cammisa
Matériaux:
Hook: Hanak H450BL; #14
Bead: Hazard Fly Fishing slotted; 3.0mm tungsten Weight: .010 wire
Thread: UNI 6/0; fire orange
Tag: Glo-Brite #5 Ribbing: UNI-French; small silver
Body: Hare's Ear Plus
Dubbin; tan
Collar: UNI 6/0; fire orange
Noter un spot en queue à base de fil de montage orange fluo, l’enroulement d’un fil de cuivre argent pour consolider et la pose d’un collier orange fluo en tête comme spot.

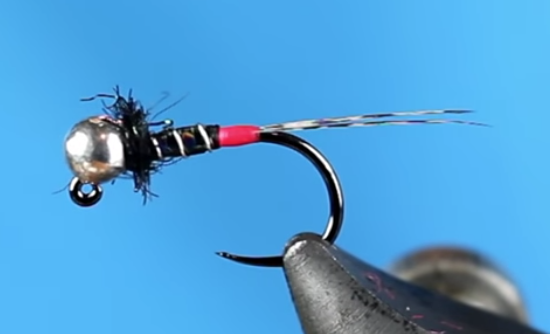
Montée par Tim Cammisa
Matériaux:
Hook: Hanak H450BL; #14
Bead: Silver slotted tungsten; 3.0mm from Hazard Fly Fishing
Threads: Glo-Brite #1; fl. fuchsia & UNI 8/0; black
Tail: Coq de Leon; medium pardo
Ribbing: UNI-French small; silver
Body: UNI-Mylar #12; holographic black
Thorax: Siman Peacock
Dubbing; peacock black
UV: Solarez Bone Dry
Notes de l’auteur : Voir la traduction de la vidéo à propos des hotspot:

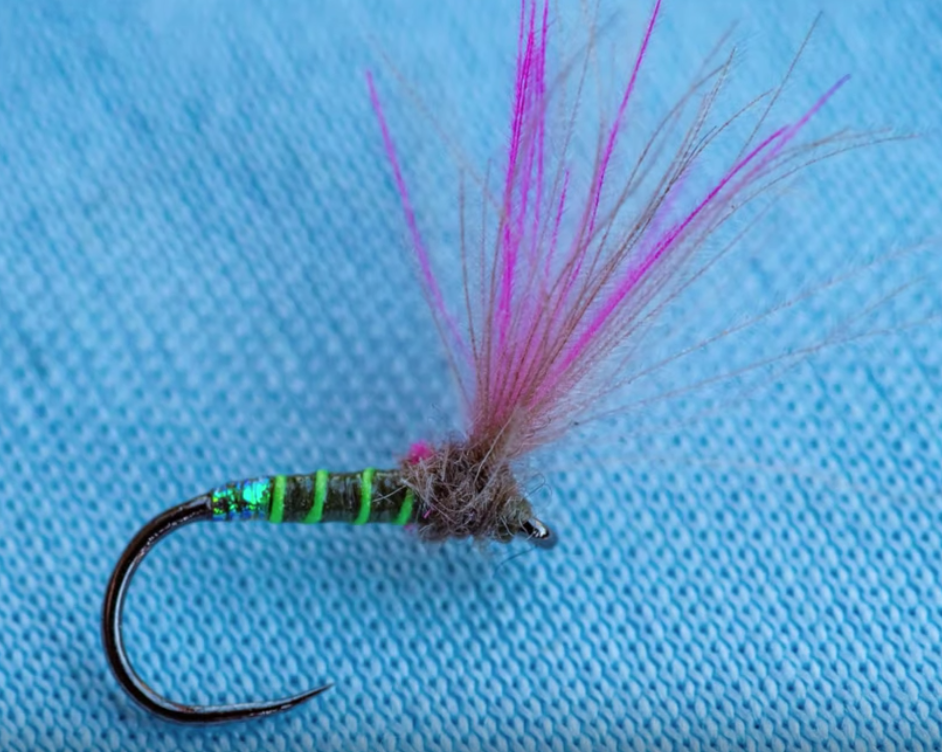
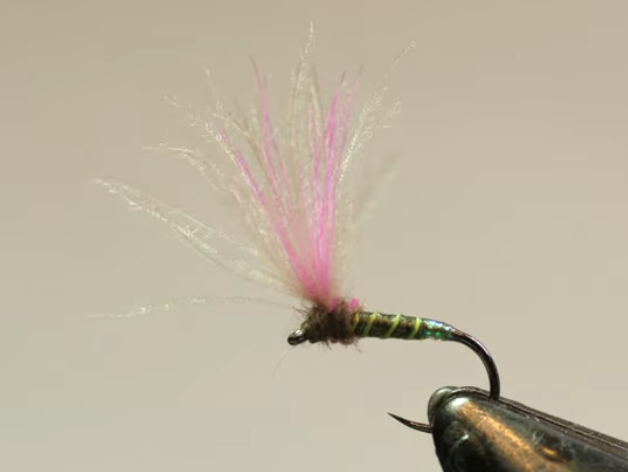
Montée par Devin Olsen
présentée par Tim Cammisa
Matériaux:
Hook: Hanak H 130 BL or Dohiku HDD 310; #18https://competitiveangler.com/shop/ho...
https://competitiveangler.com/shop/ho...
Thread: Veevus 16/0; olive dun or blue winged olive https://competitiveangler.com/shop/bo...
Tag: Micro Flashabouhttps://competitiveangler.com/shop/bo...
Ribbing: UTC 70 Denier; fluor. chartreuse https://competitiveangler.com/shop/bo...
Body: Thread Wing: CDC; natural, gray-olive, or medium slate dun https://competitiveangler.com/shop/bo...
Indicator: CDC; fluorescent pink
Dubbing: Hareline Super Fine; Adams gray https://www.tacticalflyfisher.com/har...
Glue: Loctite Brush-On Super Glue https://www.tacticalflyfisher.com/loc..
Noter un spot en queue à base de tinsel argent, l’enroulement de soie vert chartreuse, hackle CDC rose et en apparent un bout de thorax rose est volontairement laissé et non recouvert par les enroulements de dubbing,


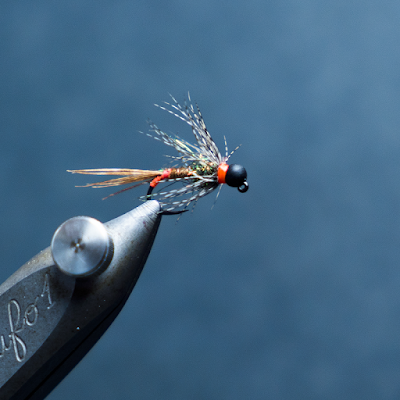
Montée par Mad River Outfitters
Matériaux:
Hook: Gamakastu J20-B #10-16- Click Here
Bead: Hanak Slotted Tungsten Bead Matte Black (or to match your specific needs)- Click Here
Thread: UTC 70 in Fluorescent colors- Click Here
Tail: Pheasant Tail Natural (or your color choice)- Click Here Click Here
Rib: Ultra Wire- Click Here
Thorax: Peacock Ice Dub- Click Here
Collar: Hungarian Partridge- Click Here Click Here
Notes de l'auteur:
This fly is not something that I originated, but like many other patterns in the tying world something that we have tweaked or customized. The standard Trophy Nymph has been a top producer for many years. It usually finds a consistent place on my nymph rigs for trout and steelhead. Using a stout hook and a tungsten bead has been the mainstay of this pattern, but it has a few downsides.
First the pattern is heavy causing it to snag easily. Secondly I tied this fly on a heavy wire nymph hook that did not open up and free itself. Thinking about how to make this fly fish well and limit snags I was reminded of my childhood. When I was much younger drifting a small jig with a long spinning rod produced many fish and seldom hung up on the bottom. From these memories the Jig Head Trophy nymph was born. Now we have high quality jig hooks and slotted beads that provide us with many options.
This fly can be tied in many different sizes, body colors, bead colors, and hook designs. Right now this is exactly how I tie and fish this pattern. The combination of the matte colored bead with the small hot spots of fluorescent colored thread is deadly. I do tie these with gold, orange, pink and silver beads also. You can experiment with different colored fluorescent hot spots also, but orange, chartreuse, and pink are the most productive in my opinion. Also do not overlook using a metallic blue, yellow, orange, or silver wire. The size shown is a 14, but I keep these in various sizes from 10 - 16. Fish this fly under a bobber/float/indicator for a great 90 degree rig or use a high stick or Euro style approach. If warm water species are more of your game then give this fly a shot at a feeding carp or under a popper for a killer panfish setup.
Ryan Ratliff- March 2018
Traduction souhaitée?

